The Deck – Week 47

As has been the norm of late, my week was busy, I only got to take photographs on three days, but I did manage to get a very nice photograph that was actually enhanced by the crazy cloudy weather we’ve been having recently.

This week I give you a scene from the Botanical Gardens, I was in the central area of the Seven Ponds, where some of the Nation’s revered men have been laid to rest; including the first Guyanese Governor General, Sir David Rose, the First President of Guyana, Arthur Chung and the great Guyanese poet Martin Carter.

Facing the ponds is The Mausoleum where the body of the second president of Guyana, Forbes Burnham, is entombed.  Linden Forbes Samson Burnham was the first Executive President of Guyana, and was called the Founder Leader during his tenure as president.

The Mausoleum is a recent addition to the Gardens being built in 1986, it has numerous sculptures on the interior walls done by Ivor Thom.

The reflection in the pond was what drew me to this scene, I hope you like it.


The Mausoleum

The Lunatic

Do you see the humanoid looking speck at the top of that hill?

That’s my brother Andre, also known as The Lunatic.  Always willing to go the extra mile or the extra climb for that perfect photograph,  We were already on top of a hill and could see a nice view and a good distance, but Andre just had to go for a higher vantage point.

That’s my brother for you!  When he was a teenager he rode from Georgetown to Lethem, he will tell you that he actually didn’t start riding until Linden, but that’s like saying the glass if fifteen-sixteenths full and not full all the way.  Anyone who has travelled the trail in recent years knows that its rough, well that trail didn’t exist in that state when he rode it, it was rougher, with steeper hills and swamps.

He is the kind of person who will run towards the tornado to get a good shot, instead of running for cover like the rest of us,  he will hang off the edge of cliffs looking at waterfalls, and jump out of a moving vehicle on a precarious hillside just because he sees a photo opportunity, leaving the rest of us panicking in the vehicle, worrying more about him than ourselves.

When Andre makes up his mind to do something, he’ll move mountains to do it, and accomplish it with style and a smile on his face.

Why am I saying all these things about him now?  Men in our family generally don’t express that much emotion to each other, we acknowledge things like pride and love with a nod of the head and a small smile.  Andre is the second member of our family to migrate this year, Joan married and migrated a few months back, none of the family have done so before, and the feelings are bitter-sweet.  We are happy for them and wish them well in their lives, a future that is unsure as always, but sure to be filled with many things new and wondrous, yet we are sad that we are losing them, it is hard to say goodbye to someone who has been a part of your life for all of memorable time.

When this blog-post goes live, I will be at the airport saying goodbye to my brother, my friend.  Vaya con dios!  Hasta la vista!

September Monochromes

I decided on the name before I realised that I have one that was actually taken in October, but since I am unable to come up with a new creative sounding name, it remains as September Monochromes.

I want to start off with a Sepia image, it’s not necessarily a great image, but I liked the elements; seashore, people – young and not-so-young, and a fishing rod.


Afternoon After-school


The next is the first of the Black and White images, it is one that I recently entered into a DP Review challenge called Clouds, I was experimenting with a borrowed Canon 80-200mm lens and most of the images came out very low contrast, so like the Sepia one above, most of the rest I’ve rendered in monochrome.  This one came out much better than expected, I had to give it a title for the challenge, so that’s how the title came to be.


Sail-winds and Silhouettes


Along the seashore, you are sure to find a coconut washed ashore by the waves, this one was partway up a concrete sloped walkway on the seawall, maybe washed there but probably kicked there by some youngster.


Coconut
Coconut


The final image is the one taken in October, after our Robbery ordeal and we daringly went right back to the Kingston Promenade, I like the clouds in the sky and thought that the lighthouse silhouetted against it would look nice  🙂

They were doing some renovation work to the lighthouse, so you might notice the scaffolding on the sides of it there.

Lawyer and/or Photographer

I’ve had this one in my upload folder for some time now, since Nikhil tried his self-portrait, and I thought at the time to just get a slightly different angle to his “back-of-the-head” shot he was going for.  Of course, my version is a little darker and more moody, but I rather liked it, but I don’t think that Nikhil liked his “stomach” showing as much as I have it  🙂

Nikhil: attorney-at-rest, photographer-at-work

I happen to think he is a very good lawyer, and quite possibly a much better photographer, but what do I know?

In the Streets

I find that I am not fixed in my photography habits as yet, as I spend more time with Nikhil, I tend to absorb some of his outlook on different types of photography.  Going into “taking pictures” I never even knew that there were so many areas of photography; Macro Photography (or macrography), Model Photography, Product Photography, Landscape Photography… You name it and there’s probably some type of photography associated with it! Anyway Nikhil has a fondness for Street Photography, he knows the Famous of the genre, like Henri Cartier Bresson, and also some of the not-so-famous  🙂  Anyway, some of it is rubbing off on me, maybe because I usually accompany him on his jaunts to find his next subject.

While it is still “not my thing”, I don’t discount it as a style that I may adopt from time to time, I just don’t think that I am any good at it  🙂

So just for starters, here are three recent ones that may fit the category.

I heard the drumming before I saw the drummer, and by the time I got across the street the original drummer had switched places with this youngster.

Drummer Boy

A popular sight on the pavements of Georgetown, everyone wants to see the latest movies:

DVD Versions

And this one is outside a busy “Betting Shop”

Locking it in

So goes my first forage into Street Photography, but I have others from the past that may fit the category, I’ll add them to the collection later  🙂

Fence Topper

One of my favourite photographs is one that I did twice  🙂  You know, so nice I did it twice?  Anyway, I took it originally when I shot with the Canon PowerShot S5, a beauty of a camera, bigger than a compact, but a super-zoom with amazing results, and then when I moved onto shooting an SLR, I tried again to shoot a similar shot, similar because you can never get the same shot twice, not really.  That was my “Fleur de Lis Fence Toppers“, and although I was less pleased the second time around, it was probably because I was expecting more.

Recently I took another shot of a Fence Topper and did a monochromatic rendering, several of them had already “disappeared” off the fence, so instead of trying to catch several of them I concentrated on one and tried to get a nice background, nice not as in scenery, but complimentary.

Silvertone Fence Topper

August Monochromes

I had a few images that I rendered in monochrome this month, these were the results of three walks I did with Nikhil, I got a few nice coloured images, but more that I processed in monochrome, which is unusual for me.  I have a few friends who always love my monochromatic work, so I think that they will like these images  🙂

I know that the title “monochromes” cover more than just black & white and sepia images, but I have not quite gotten around to expressing myself in the other formats as yet, although some of my black & white images are actually more of a selenium tone rather than pure black & white.  I tend to lean towards the idea that if it is close to black & white, then that’s where I will categorize it, even if it does have a slight tinge of another colour.  If the effect is more obvious, then I will rethink its category.

To start it off I have two Sepia images, one from the shore at the Kingston Promenade seawall and the second from the Manatee Pond at the Botanical Gardens, Georgetown.

Lonely Coconut
Feeding Time

And now for the Black and Whites, I have four new added to the album; and they go like this:

End of the Wall
Clouds over the Bandstand
Wading Out
Plaisance Palaver

I have found a fondness for monochromatic images, now all I have to do is learn how to represent them better and better, each time I try one I find something new, sometimes I want lots of detail and other times I want high contrast with starkness, sometime I want a bit of both.  Hopefully I am learning all the time  🙂

The Deck – Week 34

I have always been fascinated by the “Kissing Bridges” in the Botanical Gardens, ever since I was a child and saw paintings of it on someone’s wall or prints in the old GTC telephone directories.  These bridges have been photographed and painted for decades and I find it hard to do a current photograph of it, I have tried a few times and never been satisfied with what I came away with.

It may also have to do with the time of day that I’ve tried  🙂  recently it has always been midday, I really should try an early morning or afternoon and see what comes of it.

I was back in there again this week with Nikhil, trying to get his photo for his 365 Project, and there I was faced with the bridge again.  This time, I came away with something that I was happy with, it may not be the iconic images that live on in my memory and on canvas, but I think it speaks for itself.

My photo for the 2010 Deck for the thirty-fourth week of the year:  The Kissing Bridge

Kissing Bridge, Botanical Gardens, Georgetown, Guyana.

One way to do it… Pegasus and the Clouds HDR

I have been asked to do this, so I am obliging 🙂

Let me start by saying “I am not an expert”, far from it, I am a hobbyist who experiments with various forms of photography, I happen to like HDR images although I don’t believe I have yet gotten a perfect one, but I have some I like very much and one that has even been recognised and included in a Best Of HDRs collection on WebShots.

Normally when photographers do a High Dynamic Range (HDR) image, it is in full glorious colour, but I have always been fascinated by the idea that some scenes render better in black and white, and that some of those same scenes may even render nicely in a black and white HDR.  I think I mentioned some of the terminology before, but for clarification I will write this post as if I never did  🙂

What is an HDR?  As I understand it, and HDR is an image that tries to capture as much detail in a scene as possible, especially those in brightly lit areas and shadowed areas.  This is where HDRs work best, in a scene that has both heavy shadow and brightly lit areas.  The human eye and brain is amazing, when we look at a scene, we can see the details in both these areas at once, but a camera usually takes its metering from one area, so if we meter for the “average” light of the scene, we get some blown out areas of highlights and some extra dark shadows, if we expose for the darker areas, all the detail in the brighter areas disappear, and vice versa.

In an HDR, we take at least three images or exposures.  You can take more, I have had limited success with more images and do intend to keep experimenting with that in the future.  The greater the tonal differences from bright to dark in the scene the more images you take the better, or more precisely, the more variation in the exposure from image to image, the smoother the transition in details from light to dark will be.  For the purposes of this blog-post I confine the description to the three that I took for the “Pegasus and the Clouds” photograph of my previous post.

I use a Canon Digital Rebel T1i (also known as the EOS 500D in Europe and the KissX3 Digital in Japan), it is my first SLR camera, so all my descriptions will be formed around this camera for this post.  For my three exposures I wanted to get a wide difference in the exposures to get the impact from the clouds, so went into the Exposure compensation settings and with the scroll wheel widened the AEB or Auto Exposure Bracketing settings to +2ev and -2ev, with it set like this, I will be able to take three consecutive photos, one at normal or 0ev, one at -2ev (or underexposed) and one at +2ev (or overexposed).  I also activate “continuous shooting” on the camera, when I press the shutter button, it will take all three exposures consecutively.  One tip, use a tripod if you can, I have a bad habit of not having mine around when I want to try an HDR and always have to try them handheld, this usually plays havoc with aligning the three images in the creation process.  Since the Canon shot all three without me even lifting my finger off the button, this helped a bit as I was hand-holding  the camera:-)

The images to the left are the three exposures, as shot from the camera, the top one being “normal” followed by the underexposed shot that gives me lots of detail in the clouds, and then the overexposed shot that gives me more details in the trees and shrubs.  Since I intended this to be a Black and White HDR, I did not do any colour adjustments in Adobe Lightroom.  I am trying out Lightroom, it is an amazing software for cataloging and processing my RAW files, Amazon has it for under $300.  From Lightroom I exported the three images so that I could process the HDR in a separate software, I had never tried before so I tried using DNG files as my export this time.

The software I wanted to try the HDR combination in is Mediachance’s Dynamic HDR, for its very capable handling of HDRs I find the $55 price tag reasonable.  In this software I go to “Create new HDRI” and add my three images, verify the “ev” values, select “align files in next step”.  and hit OK.

In the alignment stage, the software “fixes” one image, and allows you to manually or automatically align the other two, I usually assume that I had no rotational alignment issues with holding the camera and concentrate on the vertical and horizontal alignment of each layer, I usually reset the values to zero and move from there.  I tend to pick a spot where there are vertical and horizontal lines or crossing lines to align, it gives more contrast and overlay assistance.

Some things I find uncontrollable, like the movement of leaves in the wind, for this black and white, I chose to just ignore them  🙂  If after aligning one portion of the image you find that there is mis-alignment in a separate area, then you need to get into the complex area of “pinning” the portion and moving on to the next area and pinning and aligning it, and so on… just remember that there are two layer that you have to align each time.

Once you think you have the image aligned as you need, hit OK and go onto the next stage which I find the most fascinating, the Tone Mapping, this is where we get to bring out the details in those areas we really want them.  Dynamic HDR has some nice presets that just need tweaking for personal preference.

For the dramatic effect I was looking for with the clouds, I went for a Ultra-Contrast local method of tone mapping, I applied the “sky” 3D filter and lowered the smoothness of that filter to get the most out of the clouds, and just played with the dramatic light strength and radius for personal preference in lighting effects.  Once I had it how I wanted I processed and saved it to a high res TIFF file, which I then re-imported into Lightroom.  Just a note here; the tone mapping portion is where the photographer’s idea of the HDR is expressed, there is so much that you can do, from creating a “cartoony” type image (which I find less preferable) to a more natural type image, to a strong highly tonal image, and more.

At this point I could have just done a Black and White conversion in Lightroom and called it a day, but I was curious to see how my favourite monochrome plugin would treat the image, so I edited the new image in Nik Silver Efex, for my black and white conversion, not much to it, just some neutral conversion and then back to Lightroom.

In Lightroom, I noticed a lot of grain in the image, so I did a touch of noise reduction, some luminance smoothing and some negative clarity, and finally a small crop to remove the post on the far right of the image.

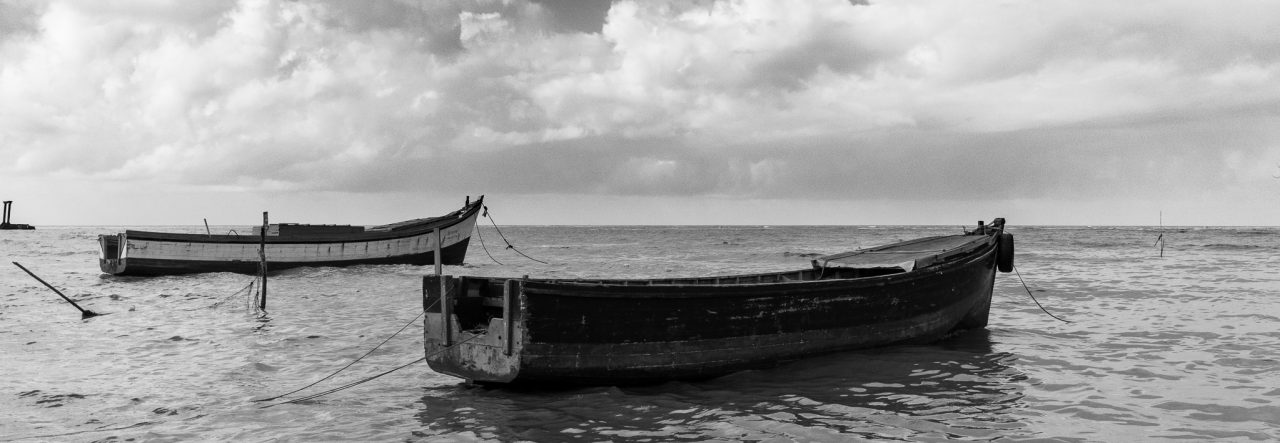
I hope I covered everything I did, since I had to do some re-creation on this as I wasn’t planning a “how to” post on this  🙂  so now I have a before and after image, a normal shot with no processing or editing, give the gloomy sky I could have done some contrast and still gotten a nice image, and the resulting HDR in BW

Just a closing note; this is based on my experience with this one image, there are other HDR software out there and there are other Black and White software too, the ones mentioned here are just the ones I was trying out with this image.  Go out, have fun!

Pegasus and the Clouds

In my younger days, I spent some of my days in my father’s house in Kingston, Georgetown, and this hotel has always been known to me as The Pegasus.  The name of the hotel has changed a few times over the years, but regardless of who has owned it or what name they gave it, it has always been known to locals as The Pegasus.  Under the new owners, it is once again The Pegasus (officially Pegasus Hotel, Guyana), a name that stirs up images of the mythological flying horse.  Of course, my images of Pegasus are of the winged white horse of the books and older movies that I recall, not the black beast of the recent movie, but times change and perceptions change.

I was walking on the Kingston Promenade with Nikhil, when I saw the clouds to the south-west, and although it is not usually a picturesque scene I thought that maybe it would make a nice Black and White HDR (High Dynamic Range)  image, so I took my three exposures and moved on to other things.  The only thing of interest in that direction, other than the clouds, was the Pegasus Hotel, so the resulting photograph was of Pegasus and the Clouds.

The resulting image come out a bit grainier than I had hoped, but I think that the overall image made a nice Black and White.

Pegasus and the Clouds - BW HDR