While I’ve never really considered this blog as a “photography blog” in the true sense, it is mostly about my photos, so sometimes, the photos just have to speak for themselves; so here’s a thousand words:
Click on the image to see it in the Gallery
Photography; I shoot what I like, and sometimes people like what I shoot. All photos are copyright to Michael C. Lam unless explicitly stated otherwise.

If I had the time in the middle of the day, I’d probably be doing just like this fellow in the photograph… sit and just stare out to sea for a while; but I was taking a walk and taking some photographs 🙂 (The walk ostensibly for health reasons and the photos for my sanity) I’ve photographed this spot many times, I was going through an old album when I came across this one and thought that a square crop would work nicely, then I saw the faint details of the clouds and thought that some tone-mapping would give me more detail and a monochrome version might just look nice, and voila! I got a bit of haloing, but I can live with that 🙂
Click on the image to see it in the Gallery along with other images in my Sepia Collection
Finding inner peace is not an easy task, and often times the path to it is fraught with despair. With the myriad of daily struggles that we all endure, and the unexpected arrival of ones that we have no control over, it is no wonder that finding inner peace is difficult, and some may even say impossible.
Take a few minutes and get away from it all, go sit on the seawall in the shade of a tree, or the lee of a rock, and stare at the seemingly boundless ocean, towards the distant horizon, let your mind wander, free from the stress that has a vice grip on your soul… just relax, find a touch of inner peace in a moment of outward calm.
Click on the image to see it larger in the Gallery.
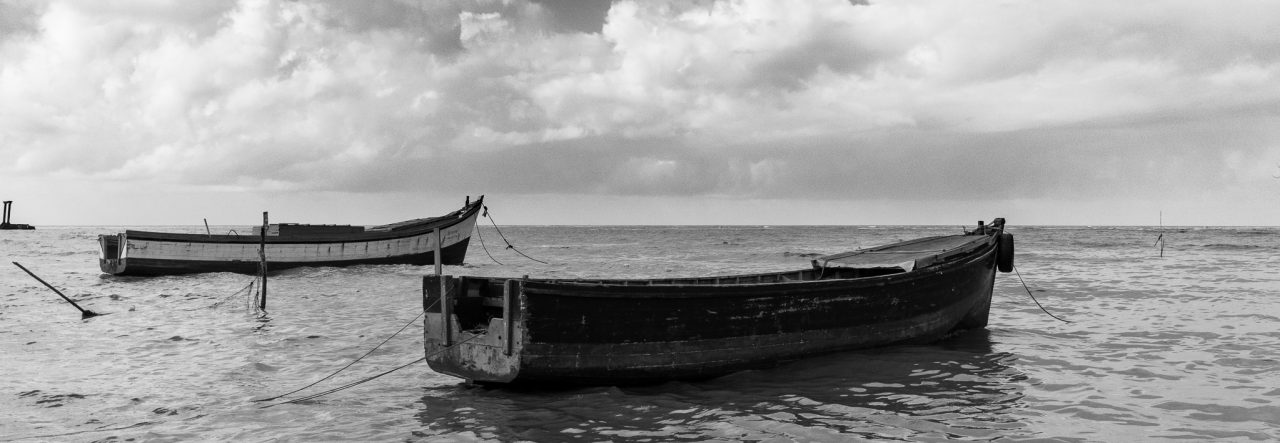
Well, I had to title it something and this sounded apt enough. Both photos have a sea-vessel and the water they traverse upon, so “Ships at Sea” it is, even though I am not sure they would call it the Sea… I’ve always been confused by that.
Growing up it was always the Sea, and protecting us from it was the Seawall, made sense…. now technically, the water to the horizon northwards from our shores is the Atlantic Ocean, I don’t think it is still the Caribbean Sea, and since I am being technical, both photos are not pointing Northwards but more West by North West, making that particular area of water the mouth of the Demerara River.
Aye, my head hurts from trying to sort that one out, so Sea or Ocean or River, its got a boat on the water. They’ve both been done in monochrome to emphasise the clouds and the water, taken on different days but in generally the same location, on the stretch of beach along the Kingston shore.
Click on them for a better view in the Gallery.


Many of my favourite images have had some amount of sky in it, I usually get very “miffed” when shooting landscape or even people and building shots and the sky is just a drab gray, I like blue skies, plain blue, hues of blue, I just really like blue skies, if there are errant clouds then all the better, but a sky fully covered with clouds usually gets to me, I found a way to deal with that over time, I look for a good scene that will process better as a monochromatic image.

While I have gotten better at that, I still like the blue, and I like dramatic skies, streaming clouds, or clouds spotting the vista to the horizon. The last Deck photo was taken on a day that had a nice variation of clouds in the sky, and I got a few others that I thought were worth sharing.
These were taken with the full intent of getting as much out of the sky as possible while still retaining some foreground interest. All were taken with the Sigma 10-20 Ultrawide Lens. I hope you like one or all 🙂
The temptation to render any of the three images into monochrome was great, but I resisted, barely. I felt that the colours in the sky and the foreground were more truly representative of the “feel” of the afternoon, than a monochrome would express, although I think I could probably have gotten more drama out of the images in monochrome 🙂

Click on the images to see them larger in the Gallery, I think I may have to print the one title “Inland Bound” larger for better scrutiny myself 🙂
This week I almost didn’t have anything to upload, and I almost went for Sasi’s idea of using the eggs 🙂 Fortunately, Nikhil had a desire to go check out the Kingston Promenade again, so we took a few minutes and went.
I started out with my Tamron telephoto lens but quickly switched to the ultra-wide Sigma 10-20, I had noticed the skies were nice, some clouds, some patches of blue showing, some streaky areas, and some heavily clouded areas, so I thought something good can come of that.
I got a few keepers from the shoot, but this one stands out, somehow a coconut got wedged or nestled into the hollow of a tree trunk on the beach… Nature’s “hole-in-one” 🙂
Click on the image for a larger viewing in the Gallery.
I liked how this particular image came out, not necessarily for art, but for the framing of the couple on the bench. It’s one of those Georgetown Seawall scenes that can be somewhat iconic.
This scene brings to mind the song by Dave Martins and the Tradewinds entitled “In Guyana”, it’s mostly of a time gone by, and mostly even before my time, but some of it pulls at my heartstrings.
Sunsets on the seawall, enjoying the breeze, Sweet Caribbean Music, blowing through the trees, a stroll along the seawall, from the Bandstand to Ayanganna, that’s how it was, In Guyana…
OK, I know those aren’t the words to the song, but I hope Dave won’t hold that against me 🙂

I have been asked to do this, so I am obliging 🙂
Let me start by saying “I am not an expert”, far from it, I am a hobbyist who experiments with various forms of photography, I happen to like HDR images although I don’t believe I have yet gotten a perfect one, but I have some I like very much and one that has even been recognised and included in a Best Of HDRs collection on WebShots.
Normally when photographers do a High Dynamic Range (HDR) image, it is in full glorious colour, but I have always been fascinated by the idea that some scenes render better in black and white, and that some of those same scenes may even render nicely in a black and white HDR. I think I mentioned some of the terminology before, but for clarification I will write this post as if I never did 🙂
What is an HDR? As I understand it, and HDR is an image that tries to capture as much detail in a scene as possible, especially those in brightly lit areas and shadowed areas. This is where HDRs work best, in a scene that has both heavy shadow and brightly lit areas. The human eye and brain is amazing, when we look at a scene, we can see the details in both these areas at once, but a camera usually takes its metering from one area, so if we meter for the “average” light of the scene, we get some blown out areas of highlights and some extra dark shadows, if we expose for the darker areas, all the detail in the brighter areas disappear, and vice versa.
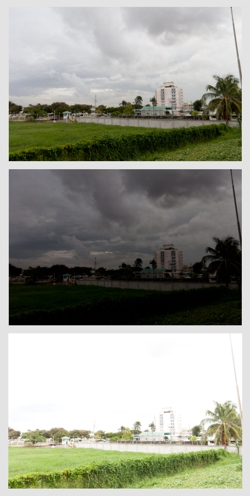
In an HDR, we take at least three images or exposures. You can take more, I have had limited success with more images and do intend to keep experimenting with that in the future. The greater the tonal differences from bright to dark in the scene the more images you take the better, or more precisely, the more variation in the exposure from image to image, the smoother the transition in details from light to dark will be. For the purposes of this blog-post I confine the description to the three that I took for the “Pegasus and the Clouds” photograph of my previous post.
 I use a Canon Digital Rebel T1i (also known as the EOS 500D in Europe and the KissX3 Digital in Japan), it is my first SLR camera, so all my descriptions will be formed around this camera for this post. For my three exposures I wanted to get a wide difference in the exposures to get the impact from the clouds, so went into the Exposure compensation settings and with the scroll wheel widened the AEB or Auto Exposure Bracketing settings to +2ev and -2ev, with it set like this, I will be able to take three consecutive photos, one at normal or 0ev, one at -2ev (or underexposed) and one at +2ev (or overexposed). I also activate “continuous shooting” on the camera, when I press the shutter button, it will take all three exposures consecutively. One tip, use a tripod if you can, I have a bad habit of not having mine around when I want to try an HDR and always have to try them handheld, this usually plays havoc with aligning the three images in the creation process. Since the Canon shot all three without me even lifting my finger off the button, this helped a bit as I was hand-holding the camera:-)
The images to the left are the three exposures, as shot from the camera, the top one being “normal” followed by the underexposed shot that gives me lots of detail in the clouds, and then the overexposed shot that gives me more details in the trees and shrubs. Since I intended this to be a Black and White HDR, I did not do any colour adjustments in Adobe Lightroom. I am trying out Lightroom, it is an amazing software for cataloging and processing my RAW files, Amazon has it for under $300. From Lightroom I exported the three images so that I could process the HDR in a separate software, I had never tried before so I tried using DNG files as my export this time.
The software I wanted to try the HDR combination in is Mediachance’s Dynamic HDR, for its very capable handling of HDRs I find the $55 price tag reasonable. In this software I go to “Create new HDRI” and add my three images, verify the “ev” values, select “align files in next step”. and hit OK.
In the alignment stage, the software “fixes” one image, and allows you to manually or automatically align the other two, I usually assume that I had no rotational alignment issues with holding the camera and concentrate on the vertical and horizontal alignment of each layer, I usually reset the values to zero and move from there. I tend to pick a spot where there are vertical and horizontal lines or crossing lines to align, it gives more contrast and overlay assistance.
Some things I find uncontrollable, like the movement of leaves in the wind, for this black and white, I chose to just ignore them 🙂 If after aligning one portion of the image you find that there is mis-alignment in a separate area, then you need to get into the complex area of “pinning” the portion and moving on to the next area and pinning and aligning it, and so on… just remember that there are two layer that you have to align each time.
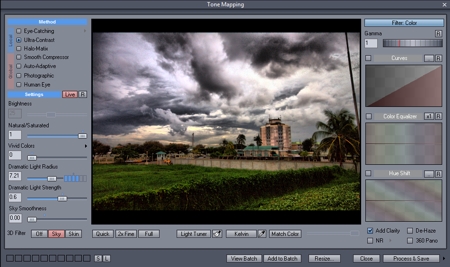
Once you think you have the image aligned as you need, hit OK and go onto the next stage which I find the most fascinating, the Tone Mapping, this is where we get to bring out the details in those areas we really want them. Dynamic HDR has some nice presets that just need tweaking for personal preference.
 For the dramatic effect I was looking for with the clouds, I went for a Ultra-Contrast local method of tone mapping, I applied the “sky” 3D filter and lowered the smoothness of that filter to get the most out of the clouds, and just played with the dramatic light strength and radius for personal preference in lighting effects. Once I had it how I wanted I processed and saved it to a high res TIFF file, which I then re-imported into Lightroom. Just a note here; the tone mapping portion is where the photographer’s idea of the HDR is expressed, there is so much that you can do, from creating a “cartoony” type image (which I find less preferable) to a more natural type image, to a strong highly tonal image, and more.
At this point I could have just done a Black and White conversion in Lightroom and called it a day, but I was curious to see how my favourite monochrome plugin would treat the image, so I edited the new image in Nik Silver Efex, for my black and white conversion, not much to it, just some neutral conversion and then back to Lightroom.
In Lightroom, I noticed a lot of grain in the image, so I did a touch of noise reduction, some luminance smoothing and some negative clarity, and finally a small crop to remove the post on the far right of the image.
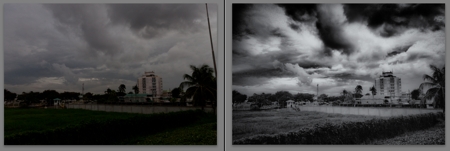
I hope I covered everything I did, since I had to do some re-creation on this as I wasn’t planning a “how to” post on this 🙂 so now I have a before and after image, a normal shot with no processing or editing, give the gloomy sky I could have done some contrast and still gotten a nice image, and the resulting HDR in BW
 Just a closing note; this is based on my experience with this one image, there are other HDR software out there and there are other Black and White software too, the ones mentioned here are just the ones I was trying out with this image. Go out, have fun!
This past week I actually took 157 images, I only took these on three days during the time span. I know this stuff only because I had to pick a favourite of the week for a challenge on DP Review, so of those images, one jumped out for me, it may not have been the best image or the most spectacular, certainly not the most colourful, but it had some meaning, and it tells a story.
Now this is the thing about photography, I am just there to record the image, the image usually tells its own story, and like many other types of art, the story can be different for each viewer. A scene will evoke different memories, different reactions, different emotions in people; none are right nor wrong, simply different.
This is my photo for the Deck, the twenty-fifth week of the year 2010, you may like it, you may not, but you will have some reaction to it, let’s just hope it’s a good reaction.
