Late Afternoon @ Better Hope

Recently I have taken to “not” reviewing my images until Friday morning, when I would choose my photograph for the 2010 Deck collection on the main site.  But this week I broke from the norm to attempt another HDR (High Dynamic Range) image.  I went with Nikhil out to get his daily photograph, and we turned down the dividing road between the villages of Better Hope and Vryheid’s Lust, I wasn’t much inspired by the things I saw, but the sky was very nice, and I thought that a wide-angle HDR would turn out nicely.  I had also just downloaded my trial version of Nik HDR Efex Pro and I wanted to try it out.

I have blogged about how I normally process my HDR images before, so this post is more about showing the results of trying the new software from Nik.  I was impressed with the similarity it has to the other Nik software I’ve tried (like the Nik SIlver Efex) and it is easy and intuitive to use.  I did not try to learn too much on this first try, just played with the basic settings to see how it stacked up against Dynamic HDR from Mediachance.

I think the resulting image speaks for itself, both Nik HDR Efex Pro and Dynamic HDR were able to help me to portray the variety of tones that I saw, in this case I was facing the slate afternoon sun, so the image has a lot more detail than a standard shot of the sky which rendered the buildings in the foreground as mostly silhouettes.

Take a look and let me know what you think  🙂  If you click on the image the site has it a bit larger.


3 Image HDR, processed using Nik HDR Efex Pro


One way to do it… Pegasus and the Clouds HDR

I have been asked to do this, so I am obliging 🙂

Let me start by saying “I am not an expert”, far from it, I am a hobbyist who experiments with various forms of photography, I happen to like HDR images although I don’t believe I have yet gotten a perfect one, but I have some I like very much and one that has even been recognised and included in a Best Of HDRs collection on WebShots.

Normally when photographers do a High Dynamic Range (HDR) image, it is in full glorious colour, but I have always been fascinated by the idea that some scenes render better in black and white, and that some of those same scenes may even render nicely in a black and white HDR.  I think I mentioned some of the terminology before, but for clarification I will write this post as if I never did  🙂

What is an HDR?  As I understand it, and HDR is an image that tries to capture as much detail in a scene as possible, especially those in brightly lit areas and shadowed areas.  This is where HDRs work best, in a scene that has both heavy shadow and brightly lit areas.  The human eye and brain is amazing, when we look at a scene, we can see the details in both these areas at once, but a camera usually takes its metering from one area, so if we meter for the “average” light of the scene, we get some blown out areas of highlights and some extra dark shadows, if we expose for the darker areas, all the detail in the brighter areas disappear, and vice versa.

In an HDR, we take at least three images or exposures.  You can take more, I have had limited success with more images and do intend to keep experimenting with that in the future.  The greater the tonal differences from bright to dark in the scene the more images you take the better, or more precisely, the more variation in the exposure from image to image, the smoother the transition in details from light to dark will be.  For the purposes of this blog-post I confine the description to the three that I took for the “Pegasus and the Clouds” photograph of my previous post.
I use a Canon Digital Rebel T1i (also known as the EOS 500D in Europe and the KissX3 Digital in Japan), it is my first SLR camera, so all my descriptions will be formed around this camera for this post.  For my three exposures I wanted to get a wide difference in the exposures to get the impact from the clouds, so went into the Exposure compensation settings and with the scroll wheel widened the AEB or Auto Exposure Bracketing settings to +2ev and -2ev, with it set like this, I will be able to take three consecutive photos, one at normal or 0ev, one at -2ev (or underexposed) and one at +2ev (or overexposed).  I also activate “continuous shooting” on the camera, when I press the shutter button, it will take all three exposures consecutively.  One tip, use a tripod if you can, I have a bad habit of not having mine around when I want to try an HDR and always have to try them handheld, this usually plays havoc with aligning the three images in the creation process.  Since the Canon shot all three without me even lifting my finger off the button, this helped a bit as I was hand-holding  the camera:-)

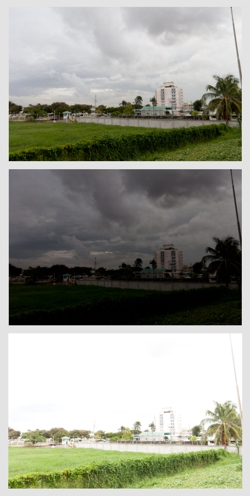
The images to the left are the three exposures, as shot from the camera, the top one being “normal” followed by the underexposed shot that gives me lots of detail in the clouds, and then the overexposed shot that gives me more details in the trees and shrubs.  Since I intended this to be a Black and White HDR, I did not do any colour adjustments in Adobe Lightroom.  I am trying out Lightroom, it is an amazing software for cataloging and processing my RAW files, Amazon has it for under $300.  From Lightroom I exported the three images so that I could process the HDR in a separate software, I had never tried before so I tried using DNG files as my export this time.

The software I wanted to try the HDR combination in is Mediachance’s Dynamic HDR, for its very capable handling of HDRs I find the $55 price tag reasonable.  In this software I go to “Create new HDRI” and add my three images, verify the “ev” values, select “align files in next step”.  and hit OK.
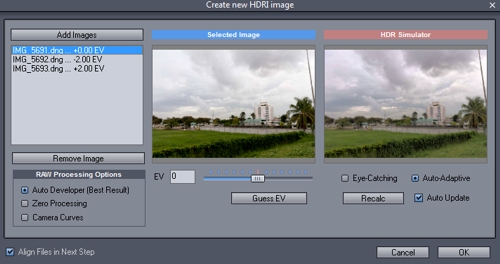
In the alignment stage, the software “fixes” one image, and allows you to manually or automatically align the other two, I usually assume that I had no rotational alignment issues with holding the camera and concentrate on the vertical and horizontal alignment of each layer, I usually reset the values to zero and move from there.  I tend to pick a spot where there are vertical and horizontal lines or crossing lines to align, it gives more contrast and overlay assistance.
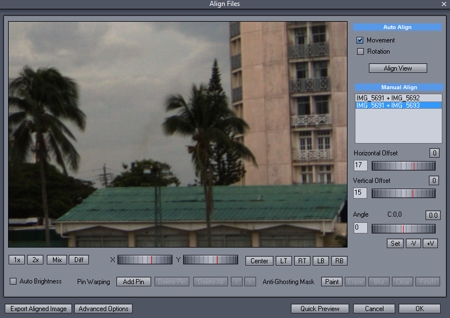
Some things I find uncontrollable, like the movement of leaves in the wind, for this black and white, I chose to just ignore them  🙂  If after aligning one portion of the image you find that there is mis-alignment in a separate area, then you need to get into the complex area of “pinning” the portion and moving on to the next area and pinning and aligning it, and so on… just remember that there are two layer that you have to align each time.

Once you think you have the image aligned as you need, hit OK and go onto the next stage which I find the most fascinating, the Tone Mapping, this is where we get to bring out the details in those areas we really want them.  Dynamic HDR has some nice presets that just need tweaking for personal preference.
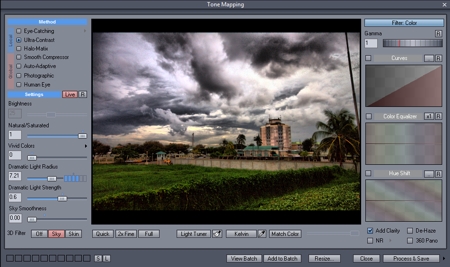
For the dramatic effect I was looking for with the clouds, I went for a Ultra-Contrast local method of tone mapping, I applied the “sky” 3D filter and lowered the smoothness of that filter to get the most out of the clouds, and just played with the dramatic light strength and radius for personal preference in lighting effects.  Once I had it how I wanted I processed and saved it to a high res TIFF file, which I then re-imported into Lightroom.  Just a note here; the tone mapping portion is where the photographer’s idea of the HDR is expressed, there is so much that you can do, from creating a “cartoony” type image (which I find less preferable) to a more natural type image, to a strong highly tonal image, and more.

At this point I could have just done a Black and White conversion in Lightroom and called it a day, but I was curious to see how my favourite monochrome plugin would treat the image, so I edited the new image in Nik Silver Efex, for my black and white conversion, not much to it, just some neutral conversion and then back to Lightroom.

In Lightroom, I noticed a lot of grain in the image, so I did a touch of noise reduction, some luminance smoothing and some negative clarity, and finally a small crop to remove the post on the far right of the image.

I hope I covered everything I did, since I had to do some re-creation on this as I wasn’t planning a “how to” post on this  🙂  so now I have a before and after image, a normal shot with no processing or editing, give the gloomy sky I could have done some contrast and still gotten a nice image, and the resulting HDR in BW
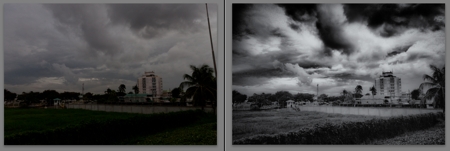
Just a closing note; this is based on my experience with this one image, there are other HDR software out there and there are other Black and White software too, the ones mentioned here are just the ones I was trying out with this image.  Go out, have fun!

Pegasus and the Clouds

In my younger days, I spent some of my days in my father’s house in Kingston, Georgetown, and this hotel has always been known to me as The Pegasus.  The name of the hotel has changed a few times over the years, but regardless of who has owned it or what name they gave it, it has always been known to locals as The Pegasus.  Under the new owners, it is once again The Pegasus (officially Pegasus Hotel, Guyana), a name that stirs up images of the mythological flying horse.  Of course, my images of Pegasus are of the winged white horse of the books and older movies that I recall, not the black beast of the recent movie, but times change and perceptions change.

I was walking on the Kingston Promenade with Nikhil, when I saw the clouds to the south-west, and although it is not usually a picturesque scene I thought that maybe it would make a nice Black and White HDR (High Dynamic Range)  image, so I took my three exposures and moved on to other things.  The only thing of interest in that direction, other than the clouds, was the Pegasus Hotel, so the resulting photograph was of Pegasus and the Clouds.

The resulting image come out a bit grainier than I had hoped, but I think that the overall image made a nice Black and White.

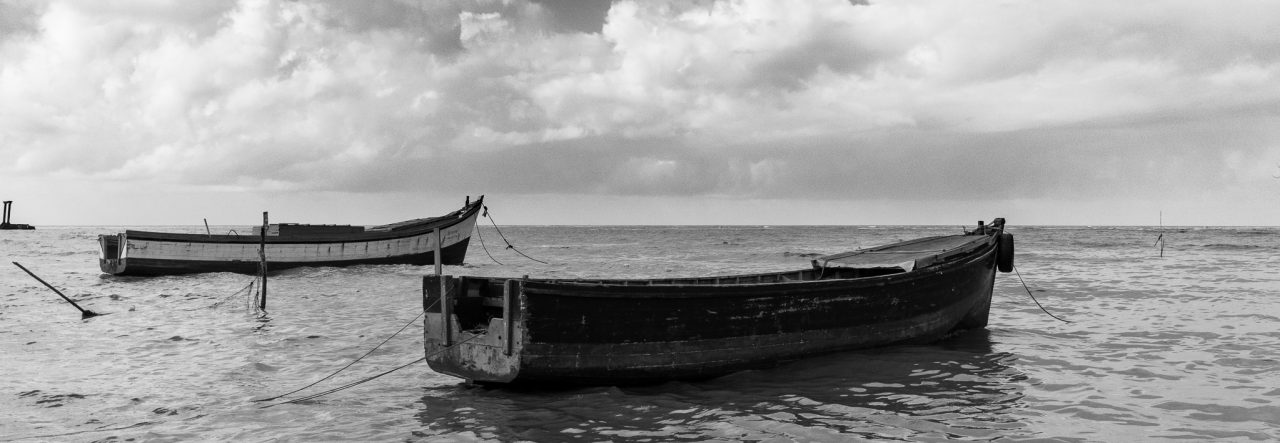
Pegasus and the Clouds - BW HDR

The Rock and The Church

I had just finished processing two photographs from my recent trip to Sint Maarten, and as I processed them I knew that I would be including both in one blog-post, then as soon as I put the title into the post I was reminded of a bible quote:

And I say to you: That you are Peter; and upon this rock I will build my church, and the gates of hell shall not prevail against it. (From the Gospel according to Matthew, 16:18)

Now the post, nor this blog-post has nothing to do with that quotation, it merely sprang to mind as I gave the post it’s title.  Some portions of Back Street (and Front Street), Philipsburg have nicely rendered cast-iron stump columns that mark the end of the pedestrian pavement and the beginning of the vehicular roadway, but there are a few spots along the street where these do not exist, at some of these spots, they have put large (maybe medium is a better description) rocks to keep the vehicles off the pedestrian walkway.  One of these intrigued me and that’s the photograph that I want to share first:

As a pedestrian on these streets, I was very hopeful that this rock, like Peter, would prevail against an errant vehicle if not the Gates of Hell.

Farther down Front Street, Philipsburg, past the Jewelery Shops and Casinos, there lies the Roman Catholic church of Saint Martin of Tours, it extends from Front Street onto the Boardwalk facing the Great Bay.  I have to assume that either the hurricanes don’t hit too hard here or this church was built to prevail.  I took the opportunity to take some multiple exposures with the intent to try an HDR image.  The pews are stained a deep reddish wood colour and this is very evident in the photograph.  The few people who go to pray during the day must be accustomed to crazy tourists snapping photographs since it didn’t seem to bother them as I took my time getting this shot, of course, I tried to be as unobtrusive as possible, but that quite hard for a man of Chinese descent with a rather large camera in hand.

St Martin of Tours Catholic Church, Philipsburg, Sint Maarten

This HDR is a composite of three exposures, 0ev, +2ev and -2ev, I still have some issues with alignment, but I think I am getting the hang of it.

Sint Maarten Day 7, and Fort St. Louis

The first shot of the day was what might have been called the “Catch of the Day”, Justin (the son of the people at whom we are staying here) and some of his friends had done some spear fishing the previous day and was about to prepare the catch for a Soup.

Catch of the Day

During the morning, we took a walk down Simpson Bay Road, there were a few older buildings along the road that I had wanted to photograph, although I took a few,there are still a few more that I want a snap at  🙂

on Simpson Bay Road, Sint Marten

The real object of our walk was to get a closer look at the Simpson Bay Market, a nice structure on the Simpson Bay Lagoon across from the Police Station and next to the Coast Guard.  I wanted to see what was there to photograph, and my wife wanted to see if any stalls were open, there was only one stall open at that time 🙂 (of course I am not counting the bar or food shop)

Simpson Bay Market

And a short walk to the Shipwrecked Pirate, a nice little shop, good footwear, and some unique gift ideas I think, but then I’m a man, what do I know, except that the barrel outside looked nice  🙂  If only it had rum in it, and a tap  🙂

at The Shipwrecked Pirate Shop

Afterwards, we were taken to do a little climbing, I can’t remember exactly where, I think it was near Baie Rouge, but it had a beautiful view as we climbed and the destination was also a spectacular view at two “seaside”caves that let water into a nestled area, but I wasn’t climbing down there!

The View

For the two caves I tried an HDR image, I didn’t get it perfect, the image has some rotational misalignment, but I liked the scene so much, I decided to keep the resulting image anyway.

HDR - Double arched natural entranceway

We then went on into Marigot (the capital of St Martin, French West Indies) for a short walk around before heading up to the fort, which was the next attraction for us.  Marigot also has more that I’d like to photograph, time permitting.

La Vie en Rose, Marigot, St Martin
Bandstand / Gazebo, The Marketplace, Marigot, St Martin
The Marketplace, Marigot, St Martin

Then we left Marigot (not really left it, since it’s a short drive up the hill to the entrance) to see the Fort Saint Louis, or rather the ruins of the fort, I can only imagine what it would look like on a stormy day (not that I really want to be there when a storm hits).

The Dungeons?
Fort Saint Louis, St Martin.
The requisite Canon

Of course, there are a lot more photos than these added to the Sint Maarten album on my site.  Be sure to check them out.  The parting shot is one taken as we were exiting the Fort proper.

Vive Le France

Black and White HDR – Good Hope July 2010

This particular HDR image needs an explanation, so here it is (well, maybe it doesn’t need one, but you’re going to get it anyway.  I went up to Good Hope on the East Coast of Demerara to pick up my family who were visiting with my in-laws for the day, after saying my hellos and pleasantries, I wandered back to the front of the yard and saw this amazing sky, I wanted to capture it as soon as I could.

A few things contributed to this being almost impossible, it was already getting dark and I did not have my tripod with me, and I wanted to get this in HDR, a standard shot just wouldn’t convey the sky that I was seeing, from ground level it was great, but the view of the sky with just the houses in front of me wasn’t appealing, so I ran upstairs with my camera.  I quickly set the camera for my multiple exposures and proceeded to snap the shots, but the first thing I noticed was that the place was so dark I ended up with longer exposures than I intended.  MY “normal shot was a half second, the underexposed one was one-eight of a second and the over-exposed shot was two seconds, all hand-held.  and then when I reviewed the images I notices a “fogginess” in the image, when I checked the lens there was a lot of condensation on it, I figured this was disastrous, the images would be totally spoiled under that combination of conditions.

When I downloaded the images I thought that I couldn’t get anything useful out of them, they were all blue, exposure was “iffy” and I wasn’t even sure that it was worth trying.  But I thought, I went to all that trouble (and exercise, running up those stairs was serious cardiovascular for a desk-jockey) I should see what the HDR software could make of it.  My first combination wasn’t too promising, but after adjusting some settings, I liked the resulting image, the colour was terrible though, so I though that even though it was not what I intended, this could very well work out to be my second Black and White HDR, I had done one before that actually made it into The Editor’s Collection – Best of HDRs at Webshots.com, if you can’t spot my image its Orinduik Falls Black and White, I am rather proud of that achievement, small though it may be.

All that being said, after I used Nik Silver Effects to do my Black and White conversion using some high structure, I liked the outcome and decided that I liked it enough to share it.  🙂

Click on the image to go to the site.

Black and White HDR - Good Hope, ECD, Guyana

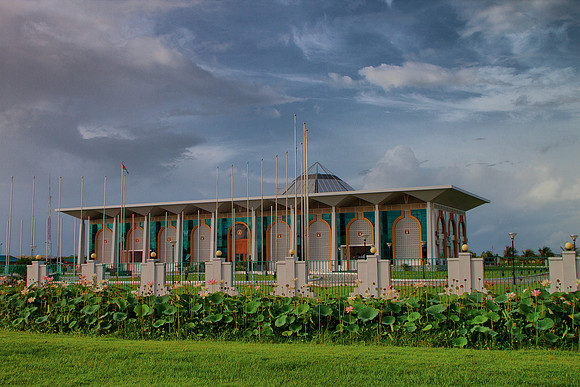
HDR – International Conference Centre, Guyana

Opportunity Knocks.

On Saturday, I had to take the vehicle to the mechanic for a strange “shuddering” that was making driving a bit nauseating, I get motion-sick it seems.  Synchronizing for someone to collect me from the mechanic was not too easy, especially as I seem to make an earlier start than most folks I know.  So, instead of waiting around outside the mechanic shop, I decided to start walking towards town, and get picked up on the way.  It was one of those times that opportunity knocks, the sky over the Conference Centre at Liliendaal was very nice and I looked at the whole scene for a minute and finally decided to try a HDR of it.

After taking two sets of three exposures I continued my walk, I have other photos from the walk, but this post is abut the HDR, so that is the only one I will link to for now.

As most photographers, whether hobbyists or professional, have discovered (sometimes the hard way), it is important to always have your camera with you, you just never know when opportunity will knock.

International Conference Centre, Liliendaal, Guyana.

HDRs from Bamboo Landing

One of my favourite types of Photographic work is an HDR (or High Dynamic Range image), I’ve played with them for some time and sometimes a scene has that nice range of light that I think would reproduce well in such an image and I just have to try it.  Most people reading this would already know what an HDR image is, if not you can always Google it, but simply put, it entails the combination of several exposures of a scene (usually a minimum of three) into a sinlge one.  It’s the same scene taken at different exposure levels, when combined the areas that may be too bright in one, and the areas that may be too dark in the other would than show more detail.
The three I most recently uploaded are from a trip I took with my brother André to Bamboo Landing and it’s associated base camp at Charabaru.  Rommel (the gentleman who runs the concession) has a beautiful home at Bamboo Landing and in it there were areas that I though would represent well in HDR, and as I was trying that I thought I’d also give the scene from his verandah a try too.
While I am far from perfection in this, I do believe that I managed to produce some pleasant images 🙂
As for the House at Bamboo Landing, I can only say that even these HDRs do not do it justice, the building is practically all wood, all from the concession, and it has a warmth that only that natural wood has.
As an editing tool in the photographer’s arsenal, the development of an HDR image helps the photographer to give the viewer a chance to see more of what the human eye saw, since our brains process these images far better than the camera  🙂