2014 Deck – Week 20

This week I got access to my third DSLR Camera, I now have access to a full frame Canon EOS 6D, and as with both my previous Cameras, I wanted the first exposure to be a good one, not necessarily great or extra-special, but a good one.

I decided this time that instead of just finding a nice scene to capture that I know would come out well, I wanted to do an experiment…  I know that I would get a vignette if I used a lens made for a crop sensor camera on a full-frame camera, so I thought I’d try to use it creatively… not sure what others would think, but I think it came out rather well…

So, now I’ve tried it, and probably won’t be doing it again 😀


Canon EOS 6D, Sigma 10-20mm Lens


Click on the image to see it in the Gallery

2014 Deck – Week 17

Always Stop!

When you see something that you think might be remotely worth photographing, don’t doubt yourself, just stop to take the photo.  Of course, I’ve had many instances where stopping just wasn’t possible, practical or prudent (read that last one as lawful), so some photos remain as electrical impulses in the synapses of our brains.  When it’s possible to stop, just stop and take out the camera and go shoot a few exposures, if not, you’ll be kicking yourself for some time after.

This was one of those times that I stopped.  I’ve driven past this building many times, and always thought that there’s a good photo there somewhere… this particular day I saw the sheep in the corralled area, the sky beyond the building, and as I turned the corner, mentioned to my wife “that’s a nice photo”, she said stop, so I stopped in the corner, got out my camera and trekked back to the junction.


Canon EOS 60D  |  Sigma 10-20mm  |  10mm, 1/160s, f/9.0, ISO100


Click on the image to see it in the Gallery.

On the Beach

When taken from a low perspective with an utra-wide-angle lens, scenes take on a different look 🙂

The bright whites at the top of the wood are harsh reflections from the one o’clock sun.

Canon EOS 60D  |  Sigma 10-20mm  |  1/125s, 10mm, f/8, ISO 100


Click on the image to see it in the Black and White Gallery, along with many others in my Black and White Collection.

2013 Deck – Week 02

During week two of this year, I actually used at least three of my lenses, including the ultra-wide Sigma 10-20mm.  On Friday, Fidal had arranged that we meet for a drink near Ogle, but before we went,  he and Rosh suggested we go to the seawall nearby to get in a few shots 🙂 (we were joined by Savita and TJ, if you must know)

As it turned out, that was a pretty good idea, there was a lovely sky above and some unusual streaming clouds (probably from the jets passing), and I got down into the grass to get a low perspective shot.


While processing it I remembered a song that I probably hadn’t heard since I was much younger, I had come across it on an LP my father had, it was called “Grazing in the Grass” by Friends of Distinction; it was one of those 70s songs, and I didn’t understand the lyrics then, and I don’t quite understand them now (yes I went and listened to it again), but then, I probably need to be high on something for those lyrics to make sense to me.  You can check the song out for yourself  🙂

As always, click on the image to see it in the Gallery.

Working With Wides

Well, I wanted to say “Playing with a Wide-angle Lens”, but I couldn’t resist the alliteration. 🙂

The word wide is relative, so I’ll describe how I use the terms, these are probably not industry accepted descriptions, so don’t quote me 🙂   Your basic entry-level DSLR usually comes with a kit lens that has a range of focal lengths from 18mm to 55mm, this I consider to be a wide telephoto lens, at the widest end (18mm) you get a nice wide view and at 55mm you get closer to close up of the subject, I consider somewhere around 33mm (on the crop-sensors) to be somewhere around “normal” (mind you, I’ll be talking from the stand-point of an APS-C sensor or crop sensor, a full frame or micro-four-thirds is an entirely different scenario)

Since this is the standard kit lens that most people get, we don’t often see it as wide, so that’s when we go Ultra-wide.

My favourite wide-angle lens (OK, the only one I have in the Ultra-wide category) is the Sigma 10-20mm, this produces pleasing images for me, and I love working with it.  You get some amount of distortion at the wider end (understandable) but this tends to be good in certain circumstances.

Often, in architectural photography, you can use wides and ultra-wides to capture more of the interior, and convey more of the sense of space and more of what encompasses the room.

At other times, you can use them closer to the subject to give an increased sense of distance, even accentuate the distortion by being close (do this with people’s faces, and you’ll get some weird effects)

I used the ultra-wide to capture the corner of this building (New Building Society), along with parts of the sidewalk and sky (and a pedestrian) 🙂

There are many things you can do with a wide, many of which I don’t do, I don’t normally put it right up to people’s faces and click, but I’ve seen those photos, and it’s a neat effect  🙂

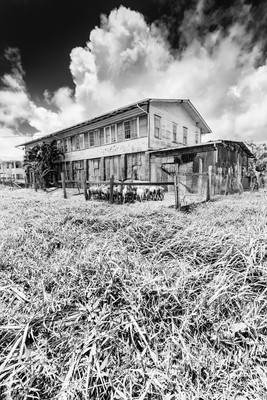
What I did in this next image was to use the ultra-wide to adjust the sense of scale, I used a fire-hydrant in the foreground to dwarf a three-story building in the background.  One thing that I liked about this shot was that I didn’t have to worry about electricity wires!

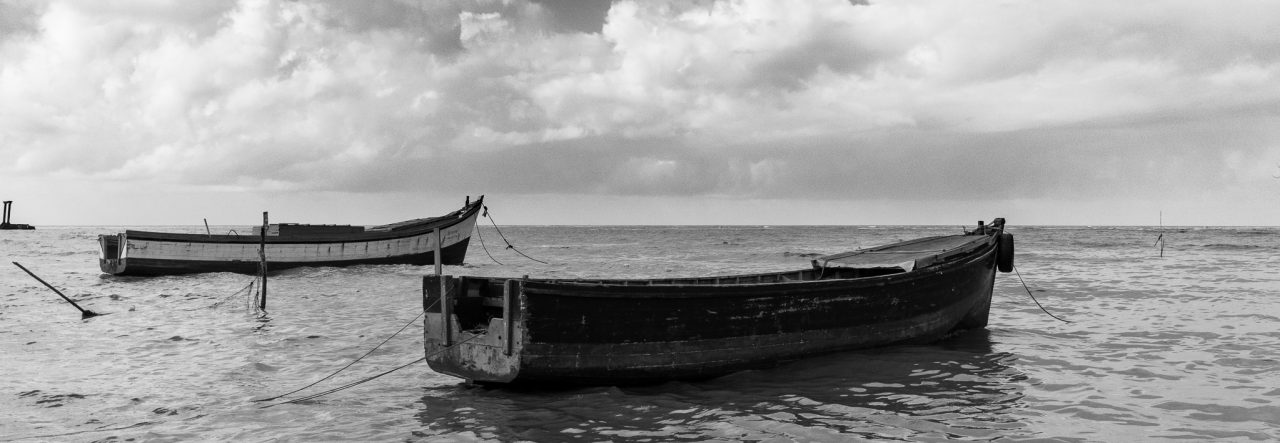
The best way to see what your wide-angle lens or your ultra-wide angle lens can do is to put it on the camera and go have fun.  Sometimes it makes compositions tricky as it tends to include everything, even things you may not want, but like working with any focal-length, it’s up to the photographer to adjust framing and composition for these things.

I mentioned using wide-angle lenses for interior architecture, well I doubt if a tent falls under the category of architecture, but I suspect the engineers who came up with the idea for this tent would appreciate the use of the wide-angle for impact  🙂  And would you look at the view!  🙂


All images above were shot with the Sigma 10-20mm on a Canon body, Click on the images to see them in the Collection along with others in their respective Galleries.


Water

Sometimes using a “rule” works in your favour.  One of the most harped-upon rules of photography is the Rule of Thirds, I think every beginner in the field knows this one.  Divide the viewfinder in three parts, both vertically and horizontally, then use that to help compose the image, whether putting subjects into the portions or onto the dividing lines.

Nikhil always tells me that we should know the rules, so we’ll know when to break them with greater effect on the resulting image, or in this case use it as literally as possible  🙂

I tried my hand at another seascape, and remembered that sometime back I was told that more than two-thirds of the earth’s surface is covered by water, so I covered two-thirds of my image with the sea-water  🙂

Click on the image for a better view in the Gallery.

2012 Deck – Week 34

This was one of those weeks where I had not taken a photo at all until I was forced to take something on the last day or abandon the Deck Project.  To be on the safe side, I stopped on the seawall to take a few photos for another “Seascape”, this would have been around the Bel Air / Sophia area.

As things turned out, I took the family out to the seawall near Lusignan, as it was nearing sunset, I took some photos in general, then settled down amidst some rocks and waited for the sun to drop to just the right height.  This was one of the few times that I had “planned” a shot (or rather the general concept of what I was looking for).  I took several at different times in different orientations, but this one was the one that appealed to me the most.

As always, click on the image for a better view in the Gallery.

2012 Deck – Week 33

One of the first things I tell people asking me about getting better at their photography is to get to know their camera, regardless what camera it is, and I tell them that one of the ways to do this is to “read the manual”, you don’t have to understand all of it at one go, just read it  🙂

Each manual has some safety precautions that they list, one of them is “Don’t shoot directly at the sun!”.  My friend Nikhil repeatedly tells me that you have to know the rules and understand them, so that you’ll know when to break them 🙂

I hope this was one of those instances where it worked since I totally ignored that rule about the sun…  and I even liked the lens flare I got in the process.

Click on the image to see it in the Gallery, along with the previous images in the Deck Project for this year.

The Deck – Week 43

Oloneo just extended their current Beta version of their software to December, and I remembered that I had wanted to experiment with a single image in their software and see what lighting possibilities there were, so this week I chose a photograph that I had wanted to do some minor lighting adjustments and colour saturations to.  As Oloneo can work directly with the RAW file I actually got quite a lot of noise in the process, and I then used some noise reduction before uploading.

As a stand-alone RAW processor it is not bad at all, nowhere close to Lightroom, but then nothing is.  I like the slider controls and I would recommend it for HDR work, and if you like experimenting, it has a unique “Relighting” HDR feature, for controlled shooting conditions, check out their site if you get the chance.

I only took 86 photos this week, but for the small number I had a slightly hard time choosing one, I think it is just because of my experimenting in Oloneo that I chose this one  🙂

This was taken at Diamond (village) on the East Bank of Demerara, the cane fields are in bloom, the sun was about to go into its daily descent for sunset and some of the clouds were reflecting the sun’s glow nicely.  Oloneo stripped out the EXIF information from the file, I hope they fix that in the final version.

I hope you enjoy it as much as I did.


Diamond Fields 7505. Canon T1i, 1/40sec f/4.5 ISO200 10mm