On the Beach

When taken from a low perspective with an utra-wide-angle lens, scenes take on a different look 🙂

The bright whites at the top of the wood are harsh reflections from the one o’clock sun.

Canon EOS 60D  |  Sigma 10-20mm  |  1/125s, 10mm, f/8, ISO 100


Click on the image to see it in the Black and White Gallery, along with many others in my Black and White Collection.

2013 Deck – Week 26

As the year progressed, I expected to be using  more Street Photographs, as I am not getting the time or opportunity to do lots of the scenic ones I like.  So this week’s taking did not surprise me that most of what I had were Street shots, and the only one I thought worth tackling to process and share was this one.

Those who know me, know that I have a thing about having the horizon level, especially where a scene is involved, but I’ve been told and shown many photographs where having the horizon absolutely level is not optimal or necessary from an artistic standpoint or through necessity.

Don’t get me wrong, I still think I could have tilted this to get the horizon straight… but it is what it is… 🙂  And I actually like it the way it is.

I’m not very good at it, but this is one of those shots using the “From the hip” technique 🙂


2013 Deck – Week 25

This week, I’m adding a new image not only to the Deck Project but to my slowly growing (as yet untitled) Seascape project.

It may be more a combination of landscape and seascape, you can see the road and the seawall, but I still consider it part of the Seascape set 🙂


Canon EOS 60D  |  Sigma 10-20mm  |  10mm, ISO100 | Red filter in Post-process


Click on the image above to see it in the Gallery.


The Driftwood.

Have you seen the driftwood that climbs the rocks,
and basks in the midday sun?
The one that crossed two oceans and a sea,
Yes, that’s the one.

It was cast adrift by a little boy
who threw it from the shore
To see if it would then return
back to him once more

He watched it bob among the waves
until it was lost from sight,
Then away he ran to play among
the children of the night

Upon many beaches it took a rest,
then washed to sea again
until it touched upon our shore
and bathed in sun and rain

I doubt that you will find it now
for I passed a hobo this morning
And I thought I smelled some fish broth
and the scent of driftwood burning.


Every Tool

I’m not a purist; I don’t hold the belief that whatever JPG comes out of the camera is the reality that existed in front of the lens.  I do, however, believe that there is a certain amount of “truth” in my photographic work.  Friends and colleagues, other photographers and budding photographers in the Guyana Photographers’ Facebook group have heard me make the distinction between Processing and Editing many times.  And I will briefly make it here again…

Since I shoot in RAW format, the camera does no processing to the file (whenever you shoot JPEG the camera applies certain adjustments to the image, contrast, brightness, etc.) so I have to Process it in software, often referred to as Post-processing.  This usually involves adjusting sliders in a software like Aperture, AfterShot, Lightroom, LightZone, etc., things that are adjusted range from brightness and contrast, to hue and saturation, cropping, temperature, white balance, noise levels and more.  Although this is usually applied over the entire image, some software allows you to do it to parts as well.

Where I draw the distinction between Processing and Editing, is when the image is altered so as to become a new image, distinct from the original in content.  Simply put, if I add something or remove something from the original photograph, then it is no longer the same, it is now a work of graphic design, not only photography.

Do I Process my images? Always.  Do I Edit my images? Sometimes.  I’ve cloned out trash that otherwise marred the scene (the lone plastic bottle on a grassy stretch), but have often left in loads of trash because it was part and parcel of the scene.  I don’t have anything against editing, but I don’t think its fair to call it a photograph after you’ve added in entire clumps of trees, removed several utility posts and added muscles to an individual… that is definitely in the realm of photo-illustration or Graphic Design.

I am also a big proponent of using every tool that you need to get the image that you saw with your eyes, and in your mind across to the viewer.  Whether its special filters on the lens to get a mood or effect, an angled lens in the developer of a dark room to create a distorted view, using Black and White (Film or processing) for an aged or structured look, using long and super-long exposures for light trails or flowing water, external flashes and reflectors for extra lighting on a subject, gels and filters for colour enhancements, or even doing some of this on the software end, I am for it, but I believe in being true to the original vision as much as possible.

Fancy processing and editing is no substitute for a good original image.  I am no expert or professional, many of my images come out of the camera looking very disappointing, and I often discard or simply not process them.  Yes, you can “save” them, I have even done so on some occasions, simply because I believe that they were worth saving, but they had to have something good in them to begin with; a good composition, a relatively good exposure, and maybe even compelling elements to the composition.

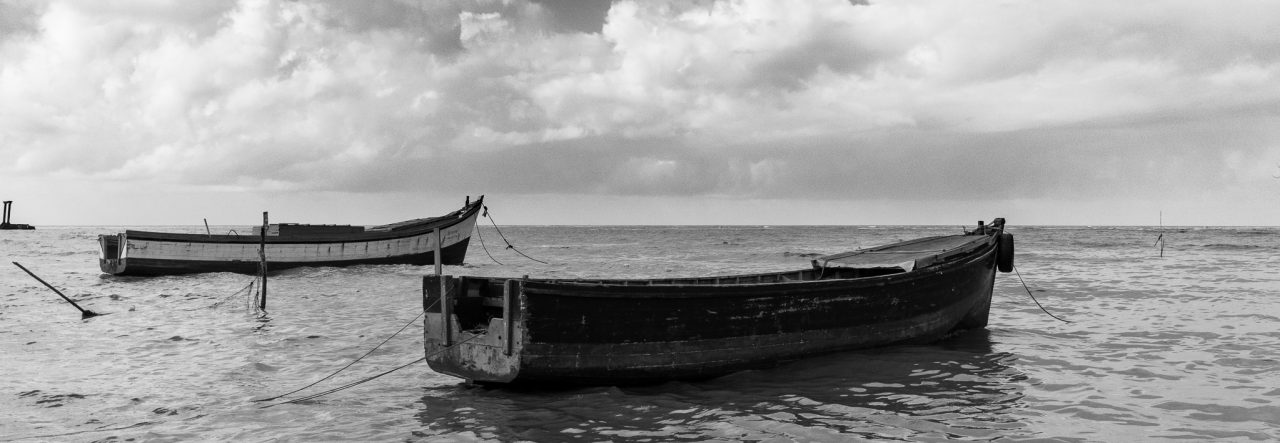
I’ve rambled enough… time for a photo.  This is one of those photos that I “saved”…  The original was good, maybe better than good, but it was not what I wanted….  I wanted more detail in the sky, more of a structured appearance than the original coloured version, and (because of an architectural quirk) more symmetry.


Canon EOS 60D  |  Tamron 18-270mm  |  21mm, 1/160s, f/7.1


I used Lightroom to create five different exposures from the original, each 2 stops apart in exposure, then I used Nik HDR Efex Pro to merge my new exposures and coax the detail I wanted from the overall scene, then I used Photoshop (I know, I’m a horrible person) to skew the perspective ever so slightly to gain some symmetry.

Although I did not add or remove anything, I normally would consider this edited since I used Photoshop to change the original proportions of the image, but in this case I’d let that slide 🙂

Click on the image to see it in the Gallery along with others in the Black and White series.

2013 Deck – Week 23

Keeping a photo project going is not easy, I found that many times I “force” the images by going out looking for things to shoot… and often times I’m not entirely satisfied with the results.  Most of the images that I like are the ones that I just happen to see, being in the right place at the right time  🙂

I was on the pavement near the intersection of Regent Street and Avenue of the Republic when I noticed the reflection of City Hall in the flooded pavement and road near to me, I actually had my camera in hand and tried to compose a few shots between people walking by me, and vehicles splashing the waters occasionally.

Some people can go out and “make” the photos, others are just the instrument that is manoeuvred into the right place at the right moment to see and capture what is shown to them  🙂


Canon Rebel T1i  |  Sigma 17-50mm  |  17mm, f/8, ISO400


Click on the image to see it in the Gallery along with the other images in the 2013 Deck Project.


Elemental


The clouds, they roll toward distant shores,
O’er seas and lakes, past engines and oars,
horizons mean nought, but a curve of land
that changes but slight, by nature or man

The sun shines on, through fog or haze,
O’er stormy skies, or clear summer days
It beats upon the land beneath
or upon the clouds, spread like a sheet

The sands, they move with the ocean’s might,
on ebb tide or flood tide, all day and night
valleys are made, with wondrous ease
and disappear as quickly as a deity’s sneeze.


Click on the image to see it in the Gallery along with others in my Black and White album

Photograph and Poem copyright to Michael C. Lam, all rights reserved.

2013 Deck – Week 20

I was processing this image as a part of another long-term project that I’ve been doing; Seascapes, but I decided that I would also include it into the Deck Project as it turned out so nicely 🙂

The water was lapping around the larger rock seen here, the tide was on it’s way out, and the sand/mud could be seen at the rock’s base when the wave had receded.  The waves seemed fairly predictable, coming in, swirling past the rock and then receding, so I set my self and waited for it, when it came in, it came a little harder and faster, and I involuntarily jerked backwards a bit and the shot actually came out at a bit of an angle, so I had to crop back to straighten the horizon.  I did have others that I could have used, but this one came out nicely, in terms of composition and the way the water was.

The skies were just how I like them recently, fairly dramatic, nice variations and with a fair amount of detail that I knew I could eke out of the RAW file.


Canon EOS 60D  |  Sigma 10-20mm  |  1/500s, f/14, 10mm  |  Rotational crop


Click on the image to see it in the Gallery

2013 Deck – Week 19

I had quickly browsed through the entire takings of this week’s photos and was about to go with a street photo for this week’s Deck Photo, when on scrolling back I saw this one tucked amidst some photos from a tea-party held at the Cathedral of the Immaculate Conception, the young ladies were using this part of the building as a staging area for their fashion show.

I had looked back towards the entrance of the compound for some reason and noticed her at the window and snapped two quick shots before she disappeared back into the building, and I rather liked how this one came out.

The building is aging and I thought that the processing should match that.


Canon 60D  |  135mm  |  1/320s  |  f/7.1  |  ISO 640  |   Processed in Nik SIlver Efex


Click on the image to see it in the Gallery along with the other images from this year’s Deck Project.

On the move

Normally I try to process my images just to get them to that stage that I like, my personal preference… so theoretically, not too much processing, just adjusting the sliders a little here and a little there…  it works for most images.

This particular image I knew that I would most likely process it in monochrome, but while making my Lightroom adjustments I felt that I wanted a little something extra out of the image….  I processed it with one aim in mind after that… to get as much detail out of that stream of clouds as I could… I even carried it into Nik Silver Efex to give it that extra structure that I was looking for…..  It even has a slight selenium tone over it.

Did I overdo it?  Some may say so, but it’s what I was looking for 🙂


Canon Rebel T1i  |  1/400s 18mm f/13


Click on the image to see it in the Gallery along with other Monochrome images.

Pegasus on the Shore

Turn back the clock 5 years and 4 months…  I was doing one of those things that the manual says not to… shooting towards the sun… but in this case I didn’t point directly at the sun.  Since I was pointing towards the late afternoon sun, all the colours in the image became washed out leaving an almost sepia-toned image, so I carried it that extra step further in post-processing and made it a Sepia-toned image.

What had caught my eye was the light glaring off of the water that remained after the tide had receded, it made for a nice high-contrast image.


March 2nd, 2008  |  Canon PowerShot S5 IS

Shot on the lonest end of the camera’s 12x Optical zoom.

Click on the image to see it larger in the Sepia Gallery, along with many of my other Sepia-toned photos